Popular Posts

World News

Showing posts with label Blogger Tricks. Show all posts

Related Posts or link within Widget For Blogger

Wednesday, 11 January 2012

Related Posts in very easy method to show you post randomly to your visitor this will display you posts to you reader  with current posts
1.Login to your blogger account and

2. Design = > Edit HTML and expand your widget templates
3.Now find this line of code
</head>
and replace it with(don't worry </head is added in below code nothing will change in you blog by replacing this code)

<!--Related Posts Scripts and Styles Start-->
<!--Remove--><b:if cond='data:blog.pageType == &quot;item&quot;'>
<style type="text/css">
#related-posts {
float:center;
text-transform:none;
height:100%;
min-height:100%;
padding-top:5px;
padding-left:5px;
}
#related-posts .widget{
padding-left:6px;
margin-bottom:10px;

}
#related-posts .widget h2, #related-posts h2{
font-size: 1.6em;
font-weight: bold;
color: black;
font-family: Georgia, &#8220;Times New Roman&#8221;, Times, serif;
margin-bottom: 0.75em;
margin-top: 0em;
padding-top: 0em;
}
#related-posts a{
color:blue;
}
#related-posts a:hover{
color:blue;
}
#related-posts ul{
list-style-type:none;
margin:0 0 0px 0;
padding:0px;
text-decoration:bold;
font-size:15px;
text-color:#000000
}
#related-posts ul li{
background:transparent url(https://blogger.googleusercontent.com/img/b/R29vZ2xl/AVvXsEiaLx7jzO1hiFx99RxkWnRJdGypSZ2ruxnuMkFj2zOK_SDc3x3c3Pj-17aG-0OmJC2zmFgFDaEKrAX5R5jIMSK1YD7Pbyne9dvijv484L6AiBy-gWKW3dH6FG0GtNGONo4ghiSw4NZwO_E/s200/greentickbullet.png) no-repeat ;
display:block;
list-style-type:none;
margin-bottom: 13px;
padding-left: 30px;
padding-top:0px;}
</style>

<script type='text/javascript'>
var relatedpoststitle="Related Posts";
</script>
<script src='http://blogergadgets.googlecode.com/files/related-posts-for-blogger.js' type='text/javascript'/>

<!--Remove--></b:if>
<!--Related Posts Scripts and Styles End-->
</head>

If you want to change the title of your widget you can edit this line of the above code


var relatedpoststitle="Related Posts";
If you want you can edit the blue and black colors present in this code
4.Now find this line of code
<div class='post-footer-line post-footer-line-1'>

If you cant find it then try finding this one
<p class='post-footer-line post-footer-line-1'>

Now immediately after any of these lines(whichever you could find) place this Below code
<!-- Related Posts Code Start-->

<!--Remove--><b:if cond='data:blog.pageType == &quot;item&quot;'>
<div id='related-posts'>
<b:loop values='data:post.labels' var='label'>

<b:if cond='data:label.isLast != &quot;true&quot;'>
</b:if>
<b:if cond='data:blog.pageType == &quot;item&quot;'>

<script expr:src='&quot;/feeds/posts/default/-/&quot; + data:label.name + &quot;?alt=json-in-script&amp;callback=related_results_labels&amp;max-results=6&quot;' type='text/javascript'/></b:if></b:loop><a href='http://www.bloggerplugins.org/2009/08/related-posts-for-blogger-widget.html'><img style="border: 0" alt="Related Posts Widget for Blogger" src="http://image.bloggerplugins.org/blogger-widgets.png" /></a>

<script type='text/javascript'>
var maxresults=5;
removeRelatedDuplicates(); printRelatedLabels(&quot;<data:post.url/>&quot;);
</script>
</div>

<!--Remove--></b:if>
<!-- Related Posts Code End-->
var maxresults=5;
this line determines the number of related posts that are displayed..and by default 6 posts are fetched from each label.

Now you should have a working related posts widget on your blog.If you want to customize the look and feel,then you can alter the CSS rules. .The codes are well commented .So this can be easily removed whenever you want..
Note: If you want to display the Related Posts on every page, then remove the 4 lines of code starting with <!--Remove-->


If You like this widget then please leave your comment for us 
Continue Reading | comments

How change label button in blogspot/blog


hey friend label is good way to search your contain in blog blogger launch this with option here we see how we can change label cloud How to Customize?


Here is a sample Style which will give a bluish look for the cloud..Here i have applied styles for all 5 label classes and their hover styles (so 10 style definitions in total).
Add Below Code before ]]></b:skin>


.label-size-5 a {color: #2789ce; /*color of a label of class 5*/
font-size: 3em;
text-decoration: none;
   }
.label-size-5 a:hover {color: #2789ce; /*color of a label of class 5 on hover*/
text-decoration: underline;
   }
.label-size-4 a {color: #2789ce;/*color of a label of class 4*/
font-size: 2.5em;
text-decoration: none;
   }
.label-size-4 a:hover {color: #2789ce;/*color of a label of class 4 on hover*/
text-decoration: underline;
   }
.label-size-3 a {color: #2789ce;/*color of a label of class 3*/
font-size: 2em;
text-decoration: none;
   }
.label-size-3 a:hover {color: #2789ce; /*color of a label of class 3 on hover*/
text-decoration: underline;
   }
.label-size-2 a {color: #2789ce;/*color of a label of class 2*/
font-size: 1.5em;
text-decoration: none;
   }
.label-size-2 a:hover {color: #2789ce; /*color of a label of class 2 on hover*/
text-decoration: underline;
   }
.label-size-1 a {color: #2789ce;/*color of a label of class 1*/
font-size: 1em;
text-decoration: none;
   }
.label-size-1 a:hover {color: #2789ce; /*color of a label of class 1 on hover*/
text-decoration: underline;
   }

Here all of these CSS styles are customizable.You can change the colours and font sizes of each of the 5 classes.
color: #2789ce; is responsible for the colouring of each of the classes.You can change it appropriately with some other hex colour code or something like color:red;
You can adjust the font size of these 5 classes by adjusting the corresponding font-size: attribute of that label size class.. (em is a unit of font size just like px)


Continue Reading | comments

Display Selective Blogger Widgets on homepage, archive,post page, or particular pages


Before getting into the details of selective display,let us discuss about the different types of pages on blogger.
1) home page- yea its your blogs home page as the name suggests(actually this is not a type. but i will still include it here..)
2) Archive Page- Refers to archive pages..
3) Item Page - Refers to Post Pages
4) Index Page - Includes home page + label page + search results page
5) Static Page – The newly introduced Blogger Pages
Selective Display..

There are different conditions to check the page type. You can use these conditions for the selective display.

You might like to display a welcome message on the home page only..

<b:if cond='data:blog.url == data:blog.homepageUrl'>
Welcome to my Blog
</b:if>


Displaying on all pages other than the homepage

<b:if cond='data:blog.url != data:blog.homepageUrl'>
this is not the homepage
</b:if>


Displaying something on the Archive Pages..

<b:if cond='data:blog.pageType == &quot;archive&quot;'>
Hii this is an archive page
</b:if>


Displaying something on non Archive Pages..

<b:if cond='data:blog.pageType != &quot;archive&quot;'>
Hii this is an non archive page
</b:if>


Displaying something on post page only

<b:if cond='data:blog.pageType == &quot;item&quot;'>
Hii this is a post page
</b:if>


Displaying something on non post page only

<b:if cond='data:blog.pageType != &quot;item&quot;'>
Hii this is a non post page
</b:if>

Displaying something on static  pages only

<b:if cond='data:blog.pageType == &quot;static_page&quot;'>
Hii this is a static page
</b:if>


Displaying something on  all other than static pages

<b:if cond='data:blog.pageType != &quot;static_page&quot;'>
Hii this is not a static page
</b:if>


You can use the conditional thing for the index type pages. But i don't find much use in that.

Now displaying something on a particular url only (may be a particular post page only or something like that)

<b:if cond='data:blog.url == &quot;The_Particular_Page_Url&quot;'>
this will be displayed on The_Particular_Page_Url only
</b:if>
(you will have to replace The_Particular_Page_Url with the url where you need the widget to be displayed..)

Now displaying something on all pages other than a particular url

<b:if cond='data:blog.url != &quot;The_Particular_Page_Url&quot;'>
this will not be displayed on The_Particular_Page_Url
</b:if>


Now how to use two conditions (or more).. the logical AND thing.. :)

<b:if cond='data:blog.url != &quot;The_Particular_Page_Url1&quot;'>
<b:if cond='data:blog.url != &quot;The_Particular_Page_Url2&quot;'>
this is not Particular_Page_Url1 and this is not Particular_Page_Url2
</b:if>
</b:if>


the else thing..
What if you need to display something on the homepage and something else on all other pages.. here comes the use of if else

<b:if cond='data:blog.url == data:blog.homepageUrl'>
This is the homepage
line1
line2
<b:else/>
This is not the homepage
line 3
line4
</b:if>


Different combinations are possible..

Limitations
1) I don't see a way to use OR conditions
2) There isn't any direct easy way to include AND in conditional statements
3) The main drawback is that we cant enclose an entire widget within the b:if tag.. you will get some message telling that a b:section cant have b:if s ie you can wrap an unexpanded widget within a b:if condition


Wrapping a widget with the conditional tags
Every widget other than the BlogPost Widget has this general structure

<b:widget id='something' locked='' title='' type=''>
<b:includable id='main'>
somethings here
</b:includable>
</b:widget>


Wrapping conditional tags can be done as

<b:widget id='something' locked='' title='' type=''>
<b:includable id='main'>
<b:if cond='data:blog.url == &quot;The_Particular_Page_Url&quot;'>
some things here
</b:if>
</b:includable>
</b:widget>


this code will display the widget on The_Particular_Page_Url only (you have to provide this url)

Another Limitation..
wrapping the blogpost widget is little complicated as it has many b:includables.. yea you can do that too.. :)

Another Important B:if condition..

Some of you might want to display adsense ads below the first post only..OK there is a condition for checking if the post is the first post or not..
<
b:if cond='data:post.isFirstPost'>
OH yea this is the first post on this page
</b:if>
This condition will work within the blogger post loop. 
Continue Reading | comments

1. Login to your Blogger Dashboard and go to the Edit HTML page under the Design Tab , Check the “Expand Widget Templates”  Option and locate

<p class='post-footer-line post-footer-line-3'>
Or if that is not there then find
<div class='post-footer-line post-footer-line-3'>
Or if that is not there then find
<data:post.body/>
and place the  following code  just below any of these lines[whichever is present in your template].

<script language='text/javascript'> 
 var OutbrainPermaLink="<data:post.url/>"; 
 var OB_demoMode = false; 
 var OB_Script = true; 
 </script> 
 <script src='http://widgets.outbrain.com/OutbrainRater.js' type='text/javascript'/>
and Save your template. 

2. Now you would be able to See the new Star Ratings Below each of your Blogger Posts


Optional Tweak

If you want to display the Star Ratings on the Post Page only, then Wrap the Ratings code within Conditional Tags like
<b:if cond='data:blog.pageType == &quot;item&quot;'> 
    <script language='text/javascript'> 
    var OutbrainPermaLink="<data:post.url/>"; 
    var OB_demoMode = false; 
    var OB_Script = true; 
    </script> 
    <script src='http://widgets.outbrain.com/OutbrainRater.js' type='text/javascript'/>
</b:if>

Second one easily  instantiation
Click here Outbrain Website
 
Continue Reading | comments

Display Blog Title for Search engine Results and increase visitors

i visited so many blog some blog write add meta tag for you blog this method is also right but what we do when we have large number of post like 120 or 200 then adding meta tag for each blog posts is increasing html codes in our blog html so that i found new trick to add each post that Google and other search engine can easily find your blog posts title in their search result

  • Login to your blogger account

  • From your Dashboard opt for Layout/ Design/Template

  • Now choose Edit Html. You will see your template code there. In that template code find
    <title><data:blog.pageTitle/></title>
    and replace it with


  •  
    <!-- Start myblogtricks.blogspot.com: Changing the Blogger Title Tag -->
    <b:if cond='data:blog.url == data:blog.homepageUrl'>
    <title><data:blog.pageTitle/></title>
    <b:else/>
    <title><data:blog.pageName/><b:if cond='data:blog.pageName'> - </b:if><data:blog.title/></title>
    </b:if>
    <!-- End myblogtricks.blogspot.com: Changing the Blogger Title Tag –>
    
    
  • Now Save the Template.
  • If You like this posts then please leave a comment
    Continue Reading | comments

    How Add Facebook Like Plus Send Button together

    Tuesday, 10 January 2012

    Friend in this posts i will tell you how we can combine Facebook like button with Facebook send button  and share button you can easily get from face book here we will knowhow combine both like plus share button 

    1. login To Blogger ==> Design ==> Edit HTML
    2. Backup your template
    3. Click Expand widgets templates box
    4. Search for <data:post.body/>
    5. and now if you wish to add the plugin just below your post titles then add the giant code below just above <data:post.body/> or if you wish that the plugin may appear at the end of your posts then paste the following code just below <data:post.body/>

    <div id="fb-root"></div><script src="http://connect.facebook.net/en_US/all.js#xfbml=1"></script><fb:like href="" send="true" layout="button_count" width="450" show_faces="false" font=""></fb:like>
    Continue Reading | comments

    How Add Facebook Comment box in you Blog


    Facebook comment feature for blog Has so many feature like
    No body Will Abuse in your post or blog if they abuse in you blog it will easy to catch them,my friend tell that he is getting  so many abusing comment in their blog and finally he make setting in their blog but this is very wasting of time of moderating and publishing large number of comment so i tell he to use Facebook comment in their blog.

    feature of Facebook comment box

    1. Threaded Comments
    2. Comment Permalinks
    3. Likability
    4. Can Subscribe or unsubscribe to comments
    5. Can Moderate Comments at one place


    Let us see how we can add Facebook comment box in you blog

    To add adding Facebook Comments Box in your  Blog: hide Existing Comment let us see how hide existing comment box

    1. Hide Existing Comments - The best way to start off is by hiding the comments made from the Blogger System. To do that, go to Settings > Posts and Comments and set the Show Comments option to Hide and Save the Settings
    image
    2. Create a Facebook App To display Facebook Comments on your Blog you should have a Facebook Application. Don’t get worried by the name. You can do that with a few clicks.
    Go to this URL https://developers.facebook.com/apps and click on the Create New App button
    image
    Enter Some name for your App Agree to the Terms and click on the continue button
    image
    If it issues a Captcha verification, type the Captcha and click on the Submit Button
    image
    Now you will be taken to a Settings Screen
    image
    In the App Domain Field give blogspot.com (If you are using a custom domain give that) Give your Blog Address in the Site URL field under “Website” and Save The Changes. Copy the Application ID from the screen
    3. Add Application and Moderator Meta Tags
    Modify the below code with the application id copied in step 2.
    <meta content='YOUR_FACEBOOK_APPLICATION_ID'   property='fb:app_id'/>
    Go to Template/Design > Edit HTML and paste the above code just below
    <head>
    and Save the Template
    image
    You should create the Facebook Application and the above fb:app_id meta tag should be added to your Blog. Otherwise you won’t be able to manage/moderate your Comments from a single Place(you will have to go to posts one my one and moderate and that too is possible only if you have added the fb:admins open graph meta tag).
    4. Add FB Comments - Now you have to add the Facebook Comment Form to your Blog Template. To do that Go to Template/Design > Edit HTML and click on the “Expand Widget Templates” checkbox
    Find the following code in your template(Use the keyboard shortcut Ctrl + F), and immediately below that paste the following code:
    <div class='post-footer-line post-footer-line-3'>
    If you can’t find this, then find
    <p class='post-footer-line post-footer-line-3'>
    If you cant find that as well, then find
    <data:post.body/>
    Paste the following code just below the line that you just found out
    <b:if cond='data:blog.pageType == "item"'>
    <div id="fb-root"></div>
    <script>(function(d){
     var js, id = 'facebook-jssdk'; if (d.getElementById(id)) {return;}
     js = d.createElement('script'); js.id = id; js.async = true;
     js.src = "//connect.facebook.net/en_US/all.js#xfbml=1";
     d.getElementsByTagName('head')[0].appendChild(js);
    }(document));</script>
    <fb:comments width='450' colorscheme='light' expr:title='data:post.title' expr:href='data:post.url' expr:xid='data:post.id'/>
    </b:if>
    If you want to alter the width, then you can change 450 to the width that you want. If you want the dark version of Facebook comments, then change light to dark in the above code.
    5.FB Namespace Declaration - Next you have to add the fb namespace to your template tag.Your template should have the specification for the fb tag that you have used. The following XML namespace declaration will take care of that. To declare the namespace, find
    <html
    and change it to
    <html xmlns:fb="https://www.facebook.com/2008/fbml"
    (there is a space after the 2008/fbml” )The following screenshot will help you out.
    image Save the Template. This namespace declaration is necessary for all FBML widgets using the fb tag. So if you have already added the namespace declaration while adding some other FB plugin, then you can skip this.
    6. Hey! You are done.. Now you should see the Comment box on your Blog :)
    If you can’t see it, then it would probably be because you have added some Non-FBML Facebook Plugin. If that is the case, then remove it and add the FBML versions of those widgets. All Facebook Plugins Provided here use the FBML markup(at the time of writing).

    Managing Your Comments

    When you are logged in to your Facebook account, the Facebook comment plugin will detect that you are the admin(it will detect you if you have added the fb:app_id or fb:admins meta tags). You will be able to manage the Settings and moderate the comments from there:
    image
    Check the “Other Login Providers” (Yahoo AOL and Hotmail)option and Save the settings if you want non-Facebook users to leave comments.
    You can moderate your comments from this URL
    http://developers.facebook.com/tools/comments

    Displaying Facebook Comment Count

    Use the following code in the post loop to get a Comment Count Display with a link to the comment form. This code should be added within the post loop. For example, this can be added below <data:post.body/>
    <b:if cond='data:post.isFirstPost'>   
    <script>(function(d){
     var js, id = 'facebook-jssdk'; if (d.getElementById(id)) {return;}
     js = d.createElement('script'); js.id = id; js.async = true;
     js.src = "//connect.facebook.net/en_US/all.js#xfbml=1";
     d.getElementsByTagName('head')[0].appendChild(js);
    }(document));</script>
    </b:if>
    <a expr:href='data:post.url + "#fb-root"'><fb:comments-count expr:href='data:post.url'></fb:comments-count> comments</a>
    If you get into trouble, then feel free to comment on :)

    If you like this post then please leave comment for us
    Continue Reading | comments

    How add Dancing status bar sliding nicely

    Monday, 9 January 2012

    Here is a sample code to show how to have a status bar which is so hyper. You could change the text in it to whatever you actually want and it will slide all over from right to left and left to right of status bar.


    How use this codes
    First you need to open the page with a HTML editor such as dream weaver or front page or even note pad , notice that if you using any other page making (ASP, PHP , etc.) languages it doesn't matter. Just open it and access to source file. 

    When you Open it, there are some codes in HTML called tags: 

    you have to find something called "BODY" 

    In HTML code it's like 

    <BODY> 

    When you find it just skip a line and copy and paste after body tag the codes which we offered you in this website 

    Anyways if you couldn't find that just paste the codes in the end of the source file.


    For blogger this is very simple open Edit html or put in java script 


    Continue Reading | comments

    how add 3d or 2d fevicon in blogger

    hey friend blogger launch fevicon feature in blogger templats you can chage this without any html  codeing see in this posts Add Favicon in your blogger templates Without any html codes editing
     but if you want to change another fevicon with effect then use this code  like this click here for  demo

    press Ctrl+F and find     ]]></b:skin>

    place this code before it


    <link href='http://indiabook.wall.fm/ow_userfiles/39449/themes/theme_image_29.gif ' rel='shortcut icon' type='image/vnd.microsoft.icon'/>

    replace you image url show in red

    Continue Reading | comments

    Add Favicon in your blogger templates Without any html codes editing


    hey friend you see in website they use their own glorious fevicon this appear in you browser let us see how we use our own fevicon replacing  blogger fevicon 

    Login to your Blogger in Draft account and go to the Design --> Page Elements.
    Now click "Edit" on the new "Favicon" setting above the navbar element.
    A new window will then open where you can select an image from your hard drive to replace the default favicon image.
    Note : This initial launch only supports .ico files , but you can easily convert your JPEG, PNG, or other non-ico image file using your own image software. There are also many conversion tools online, and a quick Google Search brings up a handful of options such as http://www.icoconverter.com/.
    After uploading the images, click on "save".
    Continue Reading | comments

    Add CSS Vertical Menu to blogger

    Sunday, 8 January 2012

    hello friend in this posts we know how we can add css  menu button in you blog follow this simple step and add css vertical menu button in your blog


    1.Login to your blogger dashboard--> layout- -> Edit HTML
    2.Find (Ctrl +F) </head> tag .
    3.Copy below code and paste it just before the </head> tag .
    <style type='text/css'>
    ul {list-style: none;
    margin: 0;
    padding: 0;
    }
    
    img {
    border: none;
    }
    #menu4 {
      width: 200px;
      margin: 10px;
      border-style: solid solid none solid;
      border-color: #000;
      border-size: 1px;
      border-width: 1px;
      }
    
    #menu4 li a {
      height: 32px;
        voice-family: &quot;\&quot;}\&quot;&quot;;
        voice-family: inherit;
        height: 24px;
      text-decoration: none;
      }
    
    #menu4 li a:link, #menu4 li a:visited {
      color: #CCC;
      display: block;
      background:  url(https://blogger.googleusercontent.com/img/b/R29vZ2xl/AVvXsEhYozZ4rOZ_z51USUTUxKqbZ49RvBhKVWCYfju8jXGg2FovqSYp5PE4G1pBeBvDGOoKOY_33YccnqjjsDD6JzVjLL9mkOXAvm7P8oe7vGNWAyHxzuENmNKVa09KoKLnWRMp99PH6vEpeQsb/);
      padding: 8px 0 0 10px;
      }
    
    #menu4 li a:hover, #menu4 li #current {
      color: #FFF;
      background:  url(https://blogger.googleusercontent.com/img/b/R29vZ2xl/AVvXsEhYozZ4rOZ_z51USUTUxKqbZ49RvBhKVWCYfju8jXGg2FovqSYp5PE4G1pBeBvDGOoKOY_33YccnqjjsDD6JzVjLL9mkOXAvm7P8oe7vGNWAyHxzuENmNKVa09KoKLnWRMp99PH6vEpeQsb/) 0 -32px;
      padding: 8px 0 0 10px;
      }
    </style>
    Note : Please Host image yourself.
    4.Save your template.
    5.Now Go to Layout-->Page Elements and click on "Add a gadget".
    6.Select "html/java script" and add the code given below and click save.
    <div id="menu4">
    <ul>
    
    <li><a href="#">Home</a></li>
    <li><a href="#">HTML</a></li>
    <li><a href="#">CSS</a></li>
    <li><a href="#">Java Script</a></li>
    <li><a href="#">Photoshop</a></li>
    <li><a href="#">About</a></li>
    <li><a href="#">Contact</a></li>
    
    </ul>
    </div>
    7.Now you are done.It will look like this:
    CSS Black Vertical Menu
    CSS Black Vertical Menu
    Demo

    Continue Reading | comments

    how show blog quickly in search engine by adding meta tag

    If you don't know what meta tags are,Meta tags are the tags which describes your site and tells the search engines what your site is all about. Adding meta tags is an important factor in Organic Search Engine Optimization (SEO). Meta tags allows search engines to index your web pages more accurately. In other words,Meta tags communicate with the search engines and tells more information about your site and make your webpages index correctly and accurately.
    Adding meta tags is very important if you want to get some good traffic from search engines like google,yahoo,msn,etc,especially the meta description part is the most important one


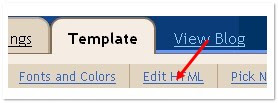
    1.Sign in to your blogger dashboard-->click the 'Layout' button[see the screenshot below]

    2.Click on the 'Edit html' tab

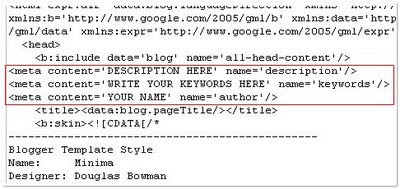
    3.Find this code:
    <b:include data='blog' name='all-head-content'/>
    4.Now add below code just after the above code.Look at below:

    <meta content='DESCRIPTION HERE' name='description'/><meta content='KEYWORDS HERE' name='keywords'/><meta content='AUTHOR NAME HERE' name='author'/>
    Replace,
    DESCRIPTION HERE:Write your blog description
    KEYWORDS:Write the keywords of your blog
    AUTHOR NAME:Write the author's name(Your name)
    Now save your template.
    Continue Reading | comments

    Highlight author comment in blogger comment

    This very difficult to recognize which comment is from author side among comment so you can make author comment different by highlighting author comment in this posts we see how highlight author comment let us see step by step setup of highlighting author comment


    step 1.Log in to your dashboard==> layout==> Edit HTML
    step 2.Click on "Expand Widget Templates"
    step 3.Press CTRL+F and Find  this:- ]]></b:skin>
    step 4.Copy below code and put it before ]]></b:skin>
    .comment-body-author {
    background: #E6E6E6; /* Background color*/
    color: #000; /* Text color*/
    border-top: 1px dotted #223344;border-bottom: 1px dotted #223344;border-left: 1px dotted #223344;border-right: 1px dotted #223344;
    margin:0;
    padding:0 0 0 20px; /* Posotion*/
    }
    step 5.Press CTRL+F and Find  this:-:-
    <dl id='comments-block'>
    <b:loop values='data:post.comments' var='comment'>
    <dt class='comment-author' expr:id='"comment-" + data:comment.id'>
    <a expr:name='"comment-" + data:comment.id'/>
    <b:if cond='data:comment.authorUrl'>
    <a expr:href='data:comment.authorUrl' rel='nofollow'><data:comment.author/></a>
    <b:else/>
    <data:comment.author/>
    </b:if>
    said...
    </dt>
    <dd class='comment-body'>
    <b:if cond='data:comment.isDeleted'>
    <span class='deleted-comment'><data:comment.body/></span>
    <b:else/>
    <p><data:comment.body/></p>
    </b:if>
    </dd>
    step 6.Replace above code with below code.
    <dl id='comments-block'>
    <b:loop values='data:post.comments' var='comment'>
    <dt class='comment-author' expr:id='"comment-" + data:comment.id'>
    <a expr:name='"comment-" + data:comment.id'/>
    <b:if cond='data:comment.authorUrl'>
    <a expr:href='data:comment.authorUrl' rel='nofollow'><data:comment.author/></a>
    <b:else/>
    <data:comment.author/>
    </b:if>
    said...
    </dt>
    <b:if cond='data:comment.author == data:post.author'>
    <dd class='comment-body-author'>
    <p><data:comment.body/></p>
    </dd>
    <b:else/>
    <dd class='comment-body'>
    <b:if cond='data:comment.isDeleted'>
    <span class='deleted-comment'><data:comment.body/></span>
    <b:else/>
    <p><data:comment.body/></p>
    </b:if>
    </dd>
    </b:if>
    step 7.Click on "Save Templates" and you are done.
    Note : You can change "Background color" , "Text color" and "Posotionof above codes.
    Continue Reading | comments

    How Enable avatar in blogger comment

    blogger commenter avatar is very easy to show in comment here is few step by which it can be enable easily
    For your safety,first backup your blogger template.To Enable avatars in blogger/blogspot comments follow the steps below.If first method doesn't work for you,then follow the second method.


    Method 1
    1.Login to your blogger dashboard--> Settings- -> Comments.
    2.Enable Show profile images on comments.
    Enable Avatars in Blogger Comments
    3.Now Click on "Save Settings" and you are done.


    Method 2 
    4.Go to Layout- -> Edit HTML.
    5.Click on "Expand Widget Templates".
    Expand Widget Templates
    6.Now search below code in your template.
    <dl expr:class='data:post.avatarIndentClass' id='comments-block'>
    NOTE: If you can find above code no problem.But if you can't find it then search:
    <dl id='comments-block'>
    or
    <div id='comments-block'>
    in your template.
    Now Replace it with:
    <dl expr:class='data:post.avatarIndentClass' id='comments-block'>
    7.Now find below code:
    <a expr:name='data:comment.anchorName'/>
    Note:You can see above code one or more time.
    8.Now Replace every above code (<a expr:name='data:comment.anchorName'/>) with below code:
    <b:if cond='data:comment.favicon'>
    <img expr:src='data:comment.favicon' height='16px' style='margin-bottom:-2px;' width='16px'/>
    </b:if>
    <a expr:name='data:comment.anchorName'/>
    <b:if cond='data:blog.enabledCommentProfileImages'>
    <div expr:class='data:comment.avatarContainerClass'>
    <data:comment.authorAvatarImage/>
    </div>
    </b:if>
    9.Now find ]]></b:skin> tag in your template.
    10.Copy below code and paste it just before ]]></b:skin> tag.
    /* Avatar */
    .avatar-image-container img {
    background:url(https://blogger.googleusercontent.com/img/b/R29vZ2xl/AVvXsEhLIqo2kZQ9AXJDZP6PHID0jhNsR5PUGFigYKJbXEmz513tXokWTtuToOI3RmDBxjnkD96-xJA1PPcly9wjA8UUxVK9T1ptMylls9EKZBBuNnCIeAp_Mx9AK4PmWKKrK_dNrrHnLEllNpU_/+avatar.png);
    width:35px;
    height:35px;
    }
    11.Save your template and you are done.

    Leave your comment if you like this posts 

    Continue Reading | comments

    How make your comment box Beautiful

    this article will help you to make beautiful comment box using css  If you like to change your blogger comment form appearance,simply follow the steps below


    1.Login to your blogger dashboard--> layout- -> Edit HTML
    2.Press CTRL+F And Find  ]]></b:skin> tag .
    3.Copy below code and paste it just before the ]]></b:skin> tag .

    #comment-form iframe{
    background:#7f9db9 url() no-repeat bottom right;
    border:7px solid #eeeeee;
    padding:5px;
    font:normal 12pt "ms sans serif", Arial;
    color:#000000;
    width:95%;
    height:250px;
    }
    #comment-form iframe:hover{
    background:#7f9db9 url() no-repeat bottom right;
    border:7px solid #bababa;
    }
    #comment-form a{
    color:#ffffff;
    }
    Beautiful CSS Comment Form to Blogger
                                                      Result Of Above Code 

    Note:You can colors,width,height,.... as your choice and also can add background images for your comment form.  putin your image url here url(Yoururl.com/pic)

    Now save your template.You are done.
    Continue Reading | comments

    Use Special Symbol In Your Blog posts

    Some time you need special symbol in your blog posts here are few symbol code that you can use in your blog posts
    1. Log in to Blogger account
    Now go to Blogger.Com and Log in to your Blogger account.

    2. Create a New Post
    In this tutorial, i am just gonna show you how to create the special characters by using some HTML entities via Edit HTML mode in your post editor, so i suggest you to do this tutorial in the post editor. Now in the Dashboard, press the New Post button in your chosen blog.

    3. Switch the tab of post editor to Edit HTML
    After landing to the New Post editor, now switch the tab from Compose to Edit HTML mode. In this mode, we will be able to insert the HTML codes in our article, and as a result, can be seen directly from Compose mode. So, it's all about switching the tabs, Compose to Edit HTML, back and forth. But now, we are gonna use the Edit HTML feature.

    4. Pick any special symbol and put the HTML entity
    As you can see below, all the Entities Name and Number can be easily used and will be resulting as a specific symbol you are referring to. For example, now pick any of these symbol you want to use, i assume that you want to use a registered trademark symbol "®" in your article, now copy either the entity name &reg; or the entity number &#8482; in the Edit HTML post editor.


    Result Description Entity Name Entity Number
    ®registered trademark&reg;&#174;
    trademark&trade;
    ¥yen&yen;&#165;
    euro&euro;&#8364;
    §section&sect;&#167;
    <less than&lt;&#60;
    >greater than&gt;&#62;
    &ampersand&amp;&#38;
    ¢cent&cent;&#162;
    © copyright &copy; &#169;
    £pound&pound;&#163;

    non-breaking space&nbsp;&#160;

    5. See the result
    To see the result of that special character, now switch the tab back to Compose mode. As you can see, in the Compose mode, the character "®" will be displayed in the post editor.
    Continue Reading | comments

    Add Search Box In Your Blog Website

    Hello Friend In This Section We find that how we can add Search Box in your blog 
    SEARCH Box is very use full to your user or visitor to search their query in your blog they can search any content in your blog from search button this is fast and easy to search any content 

    Follow this step
    1.Login to your blogger
    2.Go to LAYOUT tab
    3.Then EDIT HTML tab
    4.Click On EXPAND WIDGETS to expand html
    5. Search the below code in red

    <div class='descriptionwrapper'>
    <p class='description'><span><data:description/></span></p>


    Now Add the seach code after these lines


    You can also add your google search button or you can add this search button 
    This will show in header of your blog 


    First Search Box Code

    <form id="searchThis" action="/search" style="display:inline;" method="get"><input id="searchBox" name="q" type="text"/> <input id="searchButton" value="Go" type="submit"/></form>


    Change the text in red to any text like search or hit you want to display in button to hit the search.

    Your search box will appear like this below.
    RESULT OF ABOVE CODE


    Second Search Box Code

    If you want to add some styling like this new sample below:-


    <form id="searchthis" action="/search" style="display:inline;" method="get">
    <input id="search-box" name="q" size="25" type="text" style="background: #ccccff; border: 2px solid #000066"/><input id="search-btn" value="Search" type="submit" style="background: #000066; border: 2px outset #ff0000; color: #ffffff; font-weight: bold;"/></form>


    RESULT OF ABOVE CODE
    SEARCH BUTTON WILL APPEAR HERE 

    here search button is not showing but in your blog it will show beautifully

    Edit the colors or styling in red in above codes to change the styling of search box to adjust in your template.

    Third Search Box Code

    Now if you want to add image in place of search button like below:-


    Use these codes:-


    <form id="searchthis" action="/search" style="display:inline;" method="get">
    <input id="search-box" name="q" size="25" type="text" value="Enter search terms"/><input id="search-btn" value="Search" type="image" src="http://dryicons.com/images/icon_sets/stickers_icon_set/png/16x16/search_magnifier.png" style="margin-left: 5px; margin: 3px 0 0 5px;"/></form>


    Change the image url in red above with the url of the image you want to use.and hope you would have no problem in using any of the codes.

    Now How To place search Box at different places in blogger blog:-

    To Place it in sidebar:-

    Under Template->Page Elements tab, click “Add a Page Element” at the place where you want your search box to appear.
    Select HTML/JavaScript and add the above codes.

    Continue Reading | comments

    Add Floating Recent Comment Box in your blog and website

    Saturday, 7 January 2012


    Add Floating Recent posts In Your Blogger Which You Posts

    1. Login Blogger
    2. Choose Design
    3. Choose Add Gadgets 
    4. Select HTML/JavaScript
    Paste This Code
    <script style="" src="http://files.main.bloggerstop.net/uploads/3/0/2/5/3025338/recentpostsscrollerv2.js"> </script><script style=""> var nMaxPosts = 15; var sBgColor; var nWidth; var nScrollDelay = 175; var sDirection="left"; var sOpenLinkLocation="N"; var sBulletChar="»»"; </script> <script style="" src="http://bloggerfreetemplatesdownload.blogspot.com/feeds/posts/default?alt=json-in-script&amp;callback=RecentPostsScrollerv2"> </script> 

    Replace You my Domain Name With You Domain 
    Continue Reading | comments

    Add Rainbow color In Your Link

    Hey Friend Have you see any where any link that chabge with rainbow color if yes it good if not than dont worry here i giveing you code to rainbow color link just follow this step


      • Login in your blogger 

      • choose design Go Edit HTML

      • Find <head> code,

    Paste this Code Below This 

    <script language='javascript' src='http://sites.google.com/site/amatullah83/js-indahnyaberbagi/LinkPelangi.js'/>

    Continue Reading | comments

    Add Facebook share button floating share button

    hey friend this code will help you to share your content on face with count and it track   all page of your block

    1. Go To Blogger > Design
    2. Choose a HTML/JavaScript widget
    3. Paste the following code inside it,
    <style>
    /*-------MBT Floating Sharing Widget------------*/
    #floatdiv {
      position:fixed;
    bottom:15%;
    margin-left:-70px;
    z-index:10;
    float:left;
    padding-bottom:2px;
    }
    #mbtsidebar {
            background:#fff;
            border-top:1px solid #ddd;
            border-left:1px solid #ddd;
            border-bottom:1px solid #ddd;
            border-radius:5px;
           -moz-border-radius:5px;
           -webkit-border-radius:5px;
            padding-left:5px;
            width:60px;
            margin:0 0 0 5px;
    }
    .fb_share_count_top {width:52px !important;}
    .fb_share_count_top, .fb_share_count_inner {-moz-border-radius:3px;-webkit-border-radius:3px;}
    .FBConnectButton_Small, .FBConnectButton_RTL_Small {width:52px !important; -moz-border-radius:3px;/*bs-fsmsb*/-webkit-border-radius:3px;}
    .FBConnectButton_Small .FBConnectButton_Text {padding:2px 2px 3px !important;-moz-border-radius:3px;-webkit-border-radius:3px;font-size:8px;}
    </style>


    <div id="floatdiv">
    <div id="mbtsidebar">
        <table cellpadding="1px" cellspacing="0">

        <tr>
        <td style="padding:5px 0px 0px 0;">
    <a href="http://twitter.com/share" class="twitter-share-button" data-count="vertical" data-via="mybloggertricks">Tweet</a><script type="text/javascript" src="http://platform.twitter.com/widgets.js"></script>
        </td>
        </tr>
        <tr>
        <td style="padding:5px 0 2px 0;">
        <a name="fb_share" type="box_count" href="http://www.facebook.com/sharer.php">Share</a><script src="http://static.ak.fbcdn.net/connect.php/js/FB.Share" type="text/javascript"></script>
        </td>
        </tr>
        <tr>
        <td style=" padding:5px 0px 0px 0px;">
    <script src='http://apis.google.com/js/plusone.js' type='text/javascript'> {lang: &#39;en-US&#39;} </script>
    <g:plusone size="Tall" expr:href="data:post.url">
        </g:plusone></td>
        </tr>
        <tr>
        <td>
    <p style=" line-height:0px; font-size:10px; font-weight:bold; text-align:center;"><a style="color:#D3D3D3;" href="http://www.bloggernewtrick.tk/2011/10/add-floating-facebook-share-1-button.html">Widgets</a></p>
        </td>
        </tr>
        </table>
    </div>
    </div>

         4.   Save your widget and drag it just below the post body as shown below,
    floating-widget
          5.   Now finally Click the save button at the top right corner and you are all done!
    save-button
    View your blog to see it hanging just to the left of your blog post body.

    Customization

    To align the widget more towards the left or right then edit this value margin-left:-70px;  Decreasing this numeric value will shift the widget to the right and increasing the value will shift it to left.
    To Change the background colour of the floating widget then change this background:#fff;

    If you wish to show the widget only on post pages and not the homepage then follow these steps.
    Give this floating widget a temporary title then do this
    1. Go To Blogger > Design > Edit HTML
    2. Backup your template
    3. Check the Expand Widgets Templates Box
    4. Search for the title of the widget
    5. The code for the widget will look something similar to this one,
    <b:widget id='HTML8' locked='false' title='WIDGET-TITLE-HERE'  type='HTML'>
    <b:includable id='main'>
    bla bla bla bla
    </b:includable> </b:widget>
    Once you find the title then add the following two green bolded codes just below and after the bolded black text. For example if you wish to show a widget at Homepage only then do this,

    <b:widget id='HTML8' locked='false' title='WIDGET-TITLE-HERE' type='HTML'>
    <b:includable id='main'>
    <b:if cond='data:blog.pageType == "item"'>
    bla bla bla bla
    </b:if>
    </b:includable> </b:widget>
    Save your template and you have successfully stopped the widget display on homepage and allowed it on all post pages. For learning more about how to control the widget display then read:
    Continue Reading | comments
     
    Copyright © 2011. My Blog Tricks . All Rights Reserved
    Company Info | Contact Us | Privacy policy | Term of use | Widget | Advertise with Us | Site map
    Template by My Blogtricks. Inpire by My Blog Trricks Proudly powered by Admin