


Tuesday, 10 January 2012
Facebook comment feature for blog Has so many feature like
No body Will Abuse in your post or blog if they abuse in you blog it will easy to catch them,my friend tell that he is getting so many abusing comment in their blog and finally he make setting in their blog but this is very wasting of time of moderating and publishing large number of comment so i tell he to use Facebook comment in their blog.
feature of Facebook comment box
- Threaded Comments
- Comment Permalinks
- Likability
- Can Subscribe or unsubscribe to comments
- Can Moderate Comments at one place
Let us see how we can add Facebook comment box in you blog
To add adding Facebook Comments Box in your Blog: hide Existing Comment let us see how hide existing comment box
1. Hide Existing Comments - The best way to start off is by hiding the comments made from the Blogger System. To do that, go to Settings > Posts and Comments and set the Show Comments option to Hide and Save the Settings
2. Create a Facebook App To display Facebook Comments on your Blog you should have a Facebook Application. Don’t get worried by the name. You can do that with a few clicks.
Go to this URL https://developers.facebook.com/apps and click on the Create New App button
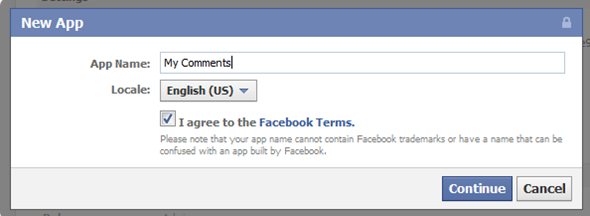
Enter Some name for your App Agree to the Terms and click on the continue button
If it issues a Captcha verification, type the Captcha and click on the Submit Button

Now you will be taken to a Settings Screen
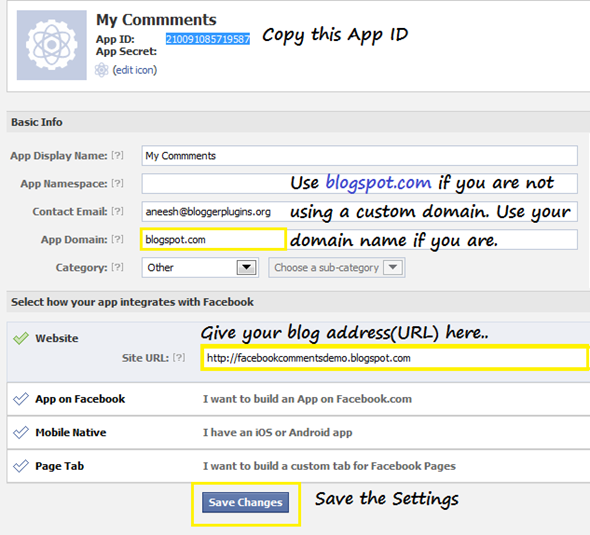
In the App Domain Field give blogspot.com (If you are using a custom domain give that) Give your Blog Address in the Site URL field under “Website” and Save The Changes. Copy the Application ID from the screen
3. Add Application and Moderator Meta Tags
Modify the below code with the application id copied in step 2.
<meta content='YOUR_FACEBOOK_APPLICATION_ID' property='fb:app_id'/>Go to Template/Design > Edit HTML and paste the above code just below<head>and Save the Template

You should create the Facebook Application and the above fb:app_id meta tag should be added to your Blog. Otherwise you won’t be able to manage/moderate your Comments from a single Place(you will have to go to posts one my one and moderate and that too is possible only if you have added the fb:admins open graph meta tag).
4. Add FB Comments - Now you have to add the Facebook Comment Form to your Blog Template. To do that Go to Template/Design > Edit HTML and click on the “Expand Widget Templates” checkbox
Find the following code in your template(Use the keyboard shortcut Ctrl + F), and immediately below that paste the following code:
<div class='post-footer-line post-footer-line-3'>If you can’t find this, then find
<p class='post-footer-line post-footer-line-3'>If you cant find that as well, then find
<data:post.body/>Paste the following code just below the line that you just found out
<b:if cond='data:blog.pageType == "item"'>
<div id="fb-root"></div>
<script>(function(d){
 var js, id = 'facebook-jssdk'; if (d.getElementById(id)) {return;}
 js = d.createElement('script'); js.id = id; js.async = true;
 js.src = "//connect.facebook.net/en_US/all.js#xfbml=1";
 d.getElementsByTagName('head')[0].appendChild(js);
}(document));</script>
<fb:comments width='450' colorscheme='light' expr:title='data:post.title' expr:href='data:post.url' expr:xid='data:post.id'/>
</b:if>
If you want to alter the width, then you can change 450 to the width that you want. If you want the dark version of Facebook comments, then change light to dark in the above code.
5.FB Namespace Declaration - Next you have to add the fb namespace to your template tag.Your template should have the specification for the fb tag that you have used. The following XML namespace declaration will take care of that. To declare the namespace, find
<htmland change it to
<html xmlns:fb="https://www.facebook.com/2008/fbml"(there is a space after the 2008/fbml” )The following screenshot will help you out.
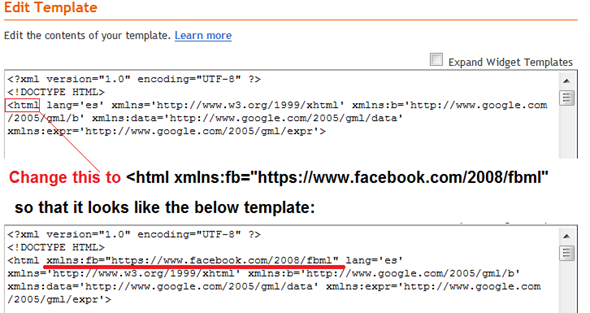 Save the Template. This namespace declaration is necessary for all FBML widgets using the fb tag. So if you have already added the namespace declaration while adding some other FB plugin, then you can skip this.
6. Hey! You are done.. Now you should see the Comment box on your Blog :)
If you can’t see it, then it would probably be because you have added some Non-FBML Facebook Plugin. If that is the case, then remove it and add the FBML versions of those widgets. All Facebook Plugins Provided here use the FBML markup(at the time of writing).
Managing Your Comments
When you are logged in to your Facebook account, the Facebook comment plugin will detect that you are the admin(it will detect you if you have added the fb:app_id or fb:admins meta tags). You will be able to manage the Settings and moderate the comments from there:
Check the “Other Login Providers” (Yahoo AOL and Hotmail)option and Save the settings if you want non-Facebook users to leave comments.
You can moderate your comments from this URL
http://developers.facebook.com/tools/comments
Displaying Facebook Comment Count
Use the following code in the post loop to get a Comment Count Display with a link to the comment form. This code should be added within the post loop. For example, this can be added below <data:post.body/><b:if cond='data:post.isFirstPost'>
<script>(function(d){
var js, id = 'facebook-jssdk'; if (d.getElementById(id)) {return;}
js = d.createElement('script'); js.id = id; js.async = true;
js.src = "//connect.facebook.net/en_US/all.js#xfbml=1";
d.getElementsByTagName('head')[0].appendChild(js);
}(document));</script>
</b:if>
<a expr:href='data:post.url + "#fb-root"'><fb:comments-count expr:href='data:post.url'></fb:comments-count> comments</a>If you get into trouble, then feel free to comment on :)If you like this post then please leave comment for us


